


How to achieve serial communication between STM32 and ESP8266?

Global electronic component supplier AMPHEO PTY LTD: Rich inventory for one-stop shopping. Inquire easily, and receive fast, customized solutions and quotes.
To achieve serial communication between an STM32 and an ESP8266, you typically use UART (Universal Asynchronous Receiver-Transmitter), which both devices support. Here's a step-by-step guide:
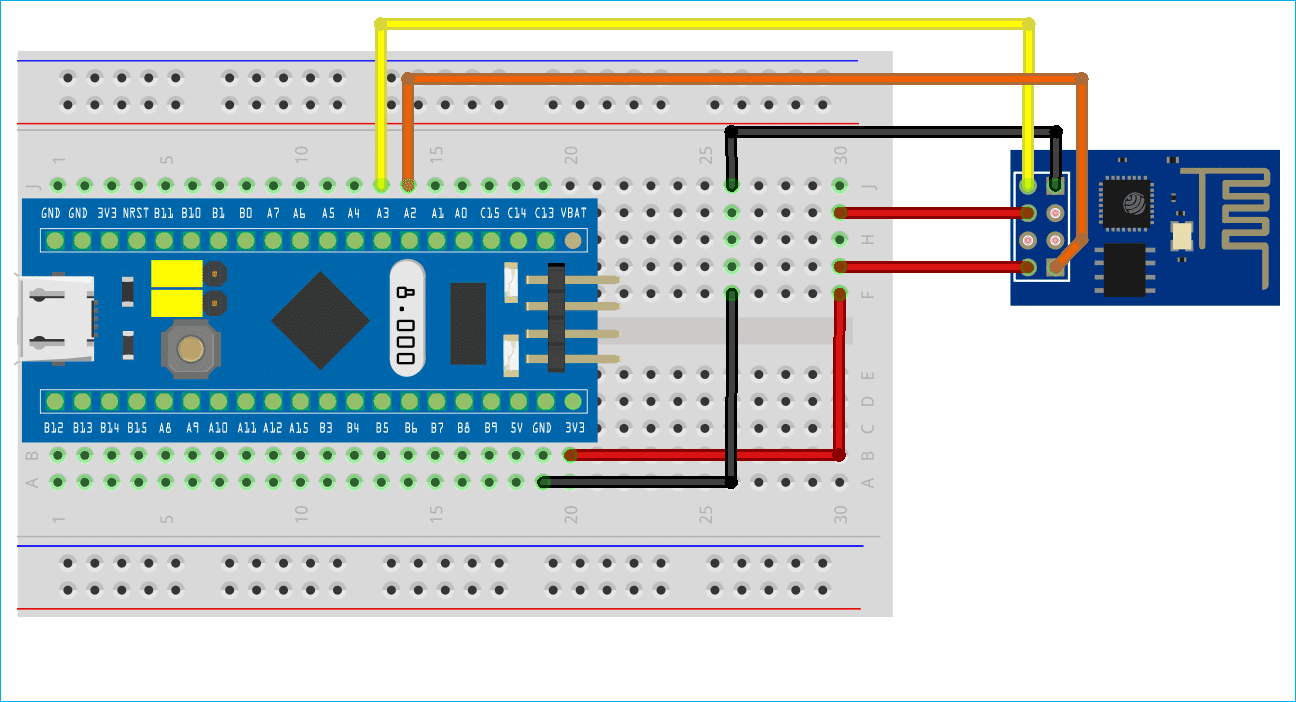
1. Physical Connection
-
STM32 UART Pins (e.g., USART1 TX/RX) → Connect to → ESP8266 RX/TX
-
Be careful: STM32 TX → ESP8266 RX, and STM32 RX ← ESP8266 TX
Voltage Compatibility
-
ESP8266 uses 3.3V logic — DO NOT use 5V on its RX pin!
-
Make sure your STM32 is also running at 3.3V.
-
If STM32 is 5V, use a level shifter or resistor divider for STM32 TX → ESP8266 RX.
2. STM32 Code (HAL-based example)
Initialize UART in STM32CubeMX or STM32CubeIDE:
3. ESP8266 Setup
The ESP8266 typically runs AT firmware (default), allowing you to send AT commands via serial to control it.
Example AT commands:
4. UART Parameters (Must Match)
| Parameter | Recommended Setting |
|---|---|
| Baud Rate | 115200 (default for ESP8266) |
| Data Bits | 8 |
| Stop Bits | 1 |
| Parity | None |
| Flow Control | None |
5. Testing
-
You can first test with a USB-to-Serial converter connected to ESP8266 and a terminal (e.g., PuTTY) to see if AT commands are working.
-
Then move to STM32 controlling the ESP.
6. Troubleshooting Tips
-
Use an oscilloscope or logic analyzer to verify UART signals.
-
Check
HAL_StatusTypeDefreturn values for errors. -
Ensure AT firmware is installed. If using custom firmware (like NodeMCU), the command set will differ.
-
Make sure the ESP8266 isn’t resetting from insufficient power — it can draw 300mA+ during Wi-Fi activity. Use a solid 3.3V regulator like AMS1117-3.3.
Alternatives
You can also flash the ESP8266 with custom firmware (e.g., using Arduino or ESP-IDF) and define your own serial protocol for communication with the STM32.
Related Articles
- ·Comparison of ARM vs. RISC-V MCUs
- ·DS18B20 Temperature Sensor Detailed Explanation and Use Cases
- ·How to deploy artificial intelligence algorithms on STM32?
- ·The Difference Between 8-bit, 16-bit, 32-bit, And 64-bit Microcontrollers
- ·STM32 PWM Principle and Application
- ·How to use STM32 as a logic analyzer?
- ·How to Create a PCB for STM32?
- ·The difference between HEX and BIN files in microcontrollers
- ·How to Make a STM32 CNC 4 Axis?